Well, I found what looks to be a 100% original
Scramble cabinet that I am bringing back to life. I got a new
grommet for the original Leaf Joystick. I also used the "Soak
in hydrogen peroxide in the sun" trick to bring the yellowed
buttons back to their original whiteness. I'm currently working
on a Cap Kit and rebuild of the monitor (HOT and Flyback too).
And, the board has the graphics right, and starts with the audio
right, but then a few seconds into a game... goes to a horrible
screeching static.
I actually have a spare Scramble. And while
I have the soldering stuff set up, I figured I'd cap kit the two
boards too. See if that helps them at all. Steve at
www.arcadeshop.com said he'd make me a cap kit if I documented the
locations for him, so I decided to do it right.
So, here's the documentation on the capacitors on
a Scramble board for doing a cap kit. I'll put the big pictures
of the entire boards, with map annotations, at the end.
The locations are called out via a grid system.
Grid is not uniform on top/bottom boards.
Total Caps needed...
One 16V 220uf
Two 16V 10uF
Two 10V 220uF
One 25V 47uF
Two 25V 100uF
Bottom/Big board - L-1200-2
1,J/K - 16V 220uf
1,J/K - 16V 220uf

5/6,D - 16V 10uF

6/7, F - 10V 220uF

10,P - 16V 10uF

Top/Small board - L-1200-1
1, A/B - 25V 47uF
1, A/B - 25V 47uF

1, K -10V 220uF

2, A - 25V 100uF
2, A - 25V 100uF
2, A - 25V 100uF

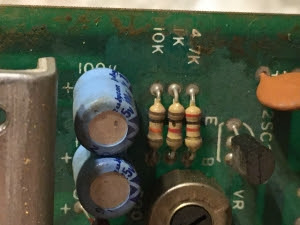
(Note, location 2,A is underneath the metal plate. This location shows the only difference in the motherboards I can find, other than a Japanese symbol printed on one board. This one show a 2K resistor, but the other shows a 4.7K resistor. On the 2K board, the pot next to it is small. On the 2K version, it's large. The board pinouts are the same shape here. Gonna assume maybe 2 different resistances on the pots required this? The board with the 2k also has 7 screws and 3 posts on the protective plate. The one with 4.7k has 6 screws and 2 posts.)
Both of the board sets I have are nearly identical except for the pots above, the metal plates, and the one board has a Japanese symbol in the corner. The ROMs are labelled the same, but the labels are cut differently (by hand) and have a different pen for what I assume is the quality check.

(Click to Expand)

(Click to Expand)

(Click to Expand)


No comments:
Post a Comment